When it comes to enhancing the aesthetic appeal of your home, your ceilings should never be overlooked. A common method of adding depth and character to ceilings involves applying texture, and no tool does it better than a ceiling texture roller. Ceiling texture rollers offer a simple, cost-effective solution to revamping a room's appearance without a complete remodel. In this blog post, we’ll delve into the nitty-gritty of ceiling texture rollers, providing you an insight into how to choose an ideal one for your home's interiors, how to use it properly, and the different types of ceiling textures you can achieve.
Understanding Ceiling Texture Rollers
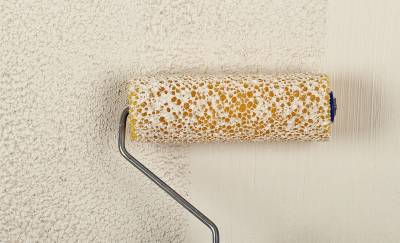
A ceiling texture roller is a specialty tool that consists of a cylindrical roller covered with patterns or designs. When rolled on a previously painted or primed surface, it imparts a texture by pressing the design into the material being applied—most commonly, joint compound, plaster, or paint. This process helps hide any imperfections and adds a unique dimension to your ceilings.
Types of Ceiling Texture Rollers
Ceiling texture rollers come in different types, each offering a unique set of designs and patterns. Each type is suited for a specific style, adding a unique touch to your space. Let's explore some popular types:
- Stomp texture roller: It is the perfect tool for creating a random, chaotic texture with patterns that seem like kicks, pushes, and crushes.
- Popcorn texture roller: It generates a highly-recognizable, bumpy texture often used in commercial or residential properties for its acoustic dampening properties.
- Knockdown texture roller: For a more subdued, modern, and trendy ceiling texture, a knockdown roller will get the job done.
Choosing the Right Ceiling Texture Roller
Selecting the right ceiling texture roller is crucial in achieving your desired effects. Key factors to consider include the material of the roller, the size of the roller, and more importantly, the pattern. Ensure to pick a roller that aligns with your interior design and personal taste.
Size of the Roller
Ceiling texture rollers come in a variety of sizes, each best suited for different aspects of the job. For larger surfaces, bigger rollers can cover more area quickly, while small rollers prove to be useful when texturing smaller, more detailed areas.
The Pattern of the Roller
The crux of selecting a texture roller lies in its pattern. This is highly subjective and depends on the type of look you want to achieve. From organic patterns mimicking natural textures such as wood grain, to geometric designs creating a more structured look, there's no limitation to the patterns you can select.
Applying Ceiling Texture with a Roller
Applying ceiling texture using a roller can be a fairly simple and straightforward process once you have the right tools and know the steps involved. Here's a simplified guide:
- Select the texture of your choice and prepare the necessary materials.
- Make sure the ceiling surface is clean and primed.
- Dip the roller in the texture material, ensuring even coverage.
- Apply the texture to the ceiling by rolling in even, steady strokes.
- Alternate the direction of the roller to get a random texture pattern.
- Let the texture dry as per the manufacturer’s instructions.
The Importance of Professional Assistance
While the process of using a ceiling texture roller might seem easy, achieving the perfect texture sometimes requires a professional touch. Experts can offer guidance on the best roller patterns for your space, apply the texture evenly, and troubleshoot any issues that may arise during the process.
In conclusion, a ceiling texture roller is a handy tool that can dramatically transform the look of your interiors. Whether you're going for a traditional, rustic or modern effect, there's a texture roller suited to your style. The key is in properly choosing, using, and maintaining your roller to achieve stunning, long-lasting results.
FAQs about Ceiling Texture Roller and Related Topics
Why should I use a ceiling texture roller instead of a regular paint roller?
Ceiling texture rollers are specifically designed to handle the thick consistency and unique application needs of textured paint. Regular paint rollers may not be able to evenly apply the paint, leading to uneven surfaces and a less desirable finish.
What are the different types of texture that a ceiling texture roller can create?
The type of texture that a ceiling texture roller can create largely depends on the type of roller cover being used. Some common types of texture include knockdown, orange peel, and popcorn. Each offers a different aesthetic appeal and can be chosen based on personal preference.
How do I prepare my ceiling before using a ceiling texture roller?
Before using a ceiling texture roller, it's important to ensure that the ceiling is clean and free of any peeling paint, dirt, or other debris. Holes or cracks should be repaired and the entire surface should be primed to ensure the texture adheres properly.
Can a ceiling texture roller be used on walls?
Yes, a ceiling texture roller can definitely be used on walls. It can add visual interest and hide minor defects in wall surfaces. However, it's best to choose a texture style that complements the existing interior design aesthetic.
What is the best way to clean a ceiling texture roller after use?
The best way to clean a ceiling texture roller largely depends on the type of paint used. For latex paint, running warm water over the roller until the water runs clear is typically sufficient. For oil-based paint, a paint thinner or similar solvent will need to be used.
How long does it typically take for a ceiling texture to dry?
The drying time for ceiling texture can vary based on the type of texture and the conditions in the room. However, generally, it should be left to dry for at least 24 hours.
Can I paint over a textured ceiling created with a roller?
Yes, you can paint over a textured ceiling created with a roller. It is, however, important to use a thick nap roller or a sprayer to ensure that the paint effectively covers the complete texture.
How can I repair a textured ceiling if it gets damaged?
In order to repair a damaged textured ceiling, you'll need to scrape off the damaged texture, repair the underlying surface, re-texture, and repaint the area. It might be tricky to recreate the exact texture, but with practice, it's definitely doable.
Are there any alternatives to a ceiling texture roller?
Yes, there are alternative tools to a ceiling texture roller. Some of these include texture sprayers or texture brushes. These tools can also help you create unique and beautiful textures on your ceiling.
What materials are ceiling texture rollers typically made of?
Ceiling texture rollers usually have a plastic or metal frame, with the actual roller cover made of materials such as lambswool, synthetic fibers, or foam. The different materials allow for different types of textures.
Pros of Using Ceiling Texture Rollers
Variety of Designs
One of the greatest advantages of ceiling texture rollers is the variety of designs they offer. These tools have a range of patterns on their surfaces that can be transferred to walls and ceilings, ranging from simple to intricate. Whether it’s a stucco-like texture or a more intricate splatter design, there’s a texture roller to fit your personal taste and style. Furthermore, various types of texture rollers can be combined to create a more unique and layered effect.
Cost-Effective
A major benefit of using ceiling texture rollers is that it can be a very cost-effective decorating option. It prevents the need to hire professionals to add texture to your ceilings, letting you save a considerable amount of money. The rollers themselves are relatively low-cost, and they also don't require any additional tools or materials to operate - simply some paint or plaster, and you’re good to go.
Easy to Use
Ceiling texture rollers are quite easy to use, making them perfect for even the most inexperienced DIY enthusiasts. Once you’ve chosen your design, you simply load the roller with plaster or paint, and apply it to the surface. Given a little practice, almost anyone can create exquisite textures and patterns.
- Step 1: Choose your preferred roller design.
- Step 2: Dip the roller in your texture paint or plaster.
- Step 3: Apply the roller to your ceiling or wall, following the directions to create the texture.
High versatility
Never to be underestimated is the versatility of ceiling texture rollers. Apart from being used on ceilings, they can also be used on walls to create texture. These rollers can handle different types of paint and can be used on various surface treatments, such as primer, base paint, and finish coat. This multi functionality makes them a highly flexible addition to any painting project.
Cons of Using Ceiling Texture Rollers
Learning Curve
While ceiling texture rollers are relatively easy to understand and use, they do require a bit of practice to master. Failing to understand the correct rolling technique can result in uneven patterns and textures, which might not give the desirable results. It may take a few tries to get the texture just right.
Splatter
Another potential downside of using ceiling texture rollers involves the splattering of paint or plaster. Depending upon the texture and technique used, there can be significant splatter which can create quite a mess if not prepared for. This is why it is recommended to always use protective gear such as safety glasses and coveralls when working with texture rollers.
Limited Textures
Although texture rollers come in a variety of designs, they may not offer the same level of detail as hand-troweled textures. If you're going for a unique, intricate look or trying to replicate an existing texture, it may be more challenging with a ceiling texture roller. As such, for higher level of detail, professional assistance might be required.
Time-Consuming for Larger Areas
Finally, while ceiling texture rollers can make quick work of small rooms, they can be time-consuming when it comes to larger areas. The process can become quite time-intensive, particularly if intricate designs are involved. If you’re considering a larger project, it might be worth considering bringing in professional assistance to ensure the job gets done quickly and efficiently.
Summary
By now, it should be clear how much of a useful tool a ceiling texture roller can be. Easy to use and cost-effective, they provide a unique and practical solution for updating your interior design. From creating elegant patterns to hiding flaws, they provide endless possibilities. Don’t forget to practice your technique to avoid common mistakes and achieve professional-looking results.
If you're considering a significant ceiling renovation, look no further than atlasstucco.com. Their professional advice makes the process of refreshing your home décor easier and more enjoyable. With their expert touch and your trusty ceiling texture roller, you can transform a dull ceiling into something special, injecting style and elegance into any space.
The ceiling texture roller is more than just a simple tool, it's the key to unlocking your home's potential. So go ahead, be daring. Let your design dreams come alive and replace a boring, flat ceiling with visually engaging textures. An amazing new home also brings an amazing new feeling - and the unforgettable sense of achievement that comes with it!
About Atlas Stucco
Meet Atlas Stucco, your reliable stucco company based out of beautiful Sacramento, CA. We've been standing strong in the stucco business for years and found our true passion in beautifying California homes with the sheer elegance of stucco. Along with stellar customer service, we bring exceptional craftsmanship to every project we handle, small or big! Our team of professionals takes pride in their work and it shows in every beautifully completed project. Join us and let's create a look that you'll absolutely love, with Atlas Stucco!
Tags: Ceiling Texture, Roller Techniques, DIY Projects,


